Are you tired of staring at dirty walls and wallpaper? It’s time to take action and give your home a fresh new look! Cleaning your walls may seem like a daunting task, but with these 10 simple steps, you’ll be able to effectively clean your walls and wallpaper in no time. From gathering the necessary supplies to hanging up new art, this guide will provide all the tips and tricks you need for a successful wall-cleaning adventure. So grab your cleaning gear and let’s get started!
Intoduction
When it comes to home improvement, cleaning the walls is often overlooked but can make a huge difference in transforming the look and feel of your space. Dirty walls can be an eyesore and create an uninviting atmosphere in your home. However, with these 10 simple steps, you’ll be able to clean your walls effectively and have them looking as good as new.
The key to any successful wall-cleaning venture is preparation. Before diving into cleaning mode, take some time to gather all of the necessary supplies such as a vacuum cleaner, microfiber cloth, mild detergent or soap solution and soft towel.
Once you’ve gathered everything you need for the task at hand, it’s time to get started! The first step is vacuuming your walls which will remove any loose dirt or dust that has accumulated over time. This initial step will ensure that when you wash down your walls later on there won’t be excess debris sticking around.
Following up from this point by using a microfiber cloth dipped into soapy water or mild detergent should do wonders while scrubbing away at those pesky stains without damaging painted surfaces like colours fading away due harsh chemicals used during cleaning process.
Rinsing off cleaned areas with plain water before drying them thoroughly using another soft towel would give amazing results making it seem like freshly painted surface altogether!
Gather your supplies
Before you start cleaning your walls and wallpaper, it’s important to gather all the supplies you’ll need. Having everything on hand will make the process much more efficient and ensure that you don’t miss any spots. Here are some of the essential tools and materials:
Firstly, you’ll need a sturdy step ladder or stool if there are hard-to-reach areas on your walls. It’s crucial to have a stable platform to avoid accidents while cleaning.
Next, grab a vacuum cleaner with an extension wand attachment for high-up dusting. Use this tool to remove any cobwebs or loose particles from corners and edges before wiping down your walls.
A soft microfiber cloth is another must-have item for dusting surfaces without leaving behind streaks or scratches. You can also use this material when washing your walls with mild detergent mixed in water.
Depending on how dirty your walls are, you may want to use an all-purpose cleaner or specialized wall cleaning solution instead of just soap and water.
Prepare clean towels for drying the wet surface properly after washing them down. If necessary, cover nearby furniture with drop cloths or plastic sheets to prevent damage during cleaning.
By gathering these supplies beforehand, you’re setting yourself up for success in achieving spotless home interiors without damaging any surfaces!
Vacuum your walls
Vacuuming your walls may seem like a strange task, but it is an important step in effectively cleaning them. Dust and dirt can accumulate on the surface of walls and can be tough to remove with just a cloth or sponge. Here are some steps to follow when vacuuming your walls:
First, make sure that you have a soft-bristled brush attachment for your vacuum cleaner. This will prevent any scratches or damage to the wall surface.
Start at the top of the wall and work your way down, using long strokes with the brush attachment. Make sure to get into corners and around moldings.
Be gentle as you work, avoiding too much pressure on the walls or wallpaper.
If you notice any cobwebs or dust bunnies along baseboards or in corners, use a crevice tool attachment to clean them up.
Vacuuming your walls before washing them will ensure that all loose dust and debris has been removed from their surfaces. It’s also a great way to prep for painting or applying new wallpaper without having unwanted particles interfering with adhesion later on.
Taking this extra step in cleaning your home may seem odd at first but will ultimately lead towards better results in maintaining cleanliness within its interior space!
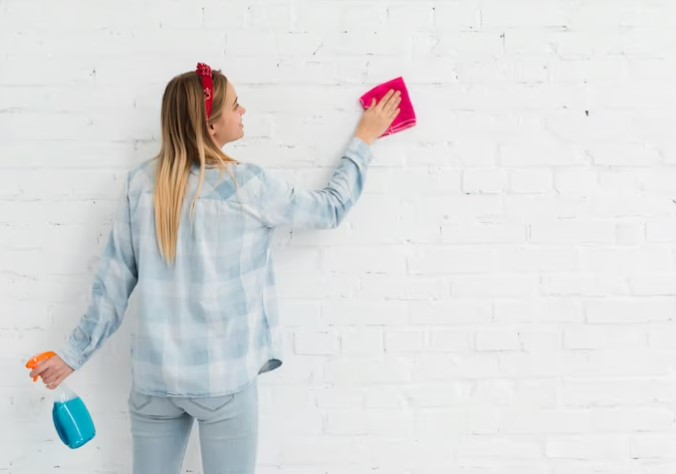
Dust your walls with a microfiber cloth
One of the most important steps in cleaning your walls effectively is dusting them with a microfiber cloth. This step helps to remove any loose dirt and debris that may have accumulated on your walls over time.
Microfiber cloths are an excellent tool for dusting because they have tiny fibers that can reach into crevices and corners, collecting even the smallest particles of dirt. They are also gentle enough not to damage delicate surfaces like wallpaper or painted walls.
To begin dusting your walls, start at the top and work your way down using long sweeping motions. Be sure to focus on areas where dust tends to accumulate, such as around light fixtures or near baseboards.
It’s essential to use a clean microfiber cloth for each room you clean to avoid spreading dirt from one area to another. You should also avoid using abrasive materials like brushes or sponges as these can scratch or damage your walls’ surface.
Regularly dusting your walls with a microfiber cloth will help keep them looking their best and extend their lifespan. It’s an easy step that only takes minutes but makes all the difference when it comes to maintaining a clean home.
Wash your walls with a mild detergent
When it comes to washing your walls, a mild detergent is the way to go. This type of cleaner will remove dirt and grime without damaging your paint or wallpaper. But before you start scrubbing away, there are a few things you should know.
Firstly, mix your detergent with warm water in a bucket. Make sure not to add too much soap as this can leave behind residue that attracts more dirt.
Next, dip your sponge or cloth into the mixture and wring out any excess water. Begin cleaning at the top of the wall and work downwards in small sections.
Remember not to apply too much pressure while scrubbing as this can damage the surface. Instead, use gentle circular motions until all dirt has been removed.
Once you finish washing each section, rinse with clean water using a separate sponge or cloth. This step is important as leftover soap can cause streaks on your walls.
Dry off any remaining moisture with a soft towel or rag. And voila! You now have clean walls that look brand new!
Rinse your walls with clean water
Once you have washed your walls with a mild detergent, it’s important to rinse them thoroughly with clean water. This step helps to remove any remaining soap residue or dirt that may be left on the surface.
Begin by filling a bucket with plain water and using a clean sponge or cloth to wipe down the entire wall surface. Be sure to wring out excess water from the sponge or cloth before applying it to the wall.
It’s also important not to oversaturate the walls with too much water as this can damage some types of wallpaper and paint finishes.
If you’re working in a room without access to running water, consider filling another bucket of clean water for rinsing purposes only. This way you won’t contaminate your cleaning solution while washing your walls.
After rinsing each section of your wall, use a fresh towel or rag to dry it off completely. Leaving wet spots can cause mold growth over time.
By following these simple steps, you’ll ensure that all soap residue and dirt has been removed from your walls leaving them looking brighter and cleaner!
Dry your walls with a soft towel
After washing your walls with a mild detergent and rinsing them with clean water, it’s important to dry them thoroughly. This not only helps prevent any water damage but also leaves a streak-free finish on the surface of your walls.

To dry your walls effectively, you’ll need a soft towel. Avoid using rough or abrasive towels that can scratch or damage delicate surfaces like wallpaper. Instead, opt for microfiber cloths or soft cotton towels that won’t leave behind lint or fibers.
Starting from the top of the wall, gently pat the towel against the surface to absorb any excess moisture. Work your way down in sections until you’ve dried the entire wall.
Be sure to change out your towel periodically as it becomes damp to ensure you’re not just spreading around moisture instead of absorbing it. If necessary, use multiple towels to get the job done efficiently.
Remember that drying time will vary depending on how much water was used during cleaning and how humid your home is. Allow enough time for each section of wall to air dry completely before moving onto another area or applying new paint or wallpaper.
By following these simple steps and taking care while drying your walls with a soft towel, you’ll be able to maintain their cleanliness and keep them looking fresh for years to come!
Apply a new coat of paint or wallpaper
Applying a new coat of paint or wallpaper is one of the simplest ways to refresh your walls and give them a brand-new look. Whether you prefer bold colors or subtle patterns, there’s no denying that this step can transform any room in your home.
Before you begin, make sure to gather all the necessary supplies such as brushes, rollers, trays, and drop cloths. If you’re opting for wallpaper instead of paint, then don’t forget to purchase adhesive and smoothing tools.
If you have old paint or wallpaper on your walls already, it’s important to remove it first before applying anything new. This will ensure that the surface is smooth and even for better results.
Once everything is prepped and ready to go, start by applying primer if needed. Then apply your chosen paint color or wallpaper pattern using steady strokes until full coverage is achieved.
Don’t forget to take breaks as needed during this process – painting can be physically demanding! And finally once dry enjoy your newly refreshed walls!
Remove any old paint or wallpaper
Removing old paint or wallpaper is a crucial step in cleaning your walls effectively. If you’re planning to apply new paint or wallpaper, it’s important to remove the old one first for better adhesion and appearance.
To begin with, gather all the necessary tools like a scraper, sandpaper, putty knife, and chemical stripper. It’s advisable to wear gloves and goggles while using these tools for safety purposes.
If you’re removing painted walls, start by scraping off any loose or chipped paint with a scraper. Then use sandpaper to smooth out any rough spots on the wall surface. Once done, use a damp cloth to wipe down the entire wall surface.
For wallpaper removal, score the paper with a scoring tool so that water can penetrate through easily. Next, apply hot water using a sponge or spray bottle onto small sections of the scored wallpaper until it becomes saturated enough to peel off easily.
In case of stubborn adhesive residue after removing paint or wallpaper from your walls, consider using chemical strippers as they work best in dissolving adhesives without damaging your wall surfaces.
Remember that removing old paint or wallpaper may take some time and effort but it will leave your walls looking fresh and clean once you’ve completed this task successfully!
Hang new art or photos on your walls
After cleaning your walls and wallpaper, it’s time to add some personality and style to your space by hanging new art or photos on your walls. This is an opportunity to showcase your unique taste and creativity in decorating your home.
When selecting art or photos for your walls, consider the size of the space you are working with. A large piece may be overwhelming in a small room while a small piece may not have enough impact in a larger room. Mix and match different sizes of artwork for added interest.
Another important factor when choosing artwork is the color scheme. Choose pieces that complement or contrast well with the colors already present in the room. This will tie everything together cohesively.
Consider creating a gallery wall by grouping several smaller pieces of art together for maximum impact. Experiment with different arrangements until you find one that works best for you.
Don’t forget about framing options when hanging new art or photos on your walls. The right frame can make all the difference in enhancing the beauty of each individual piece.
Adding new art or photos to your freshly cleaned walls will bring life and character into any living space!
Enjoy your clean
Now that you have successfully cleaned your walls and wallpaper, it’s time to sit back and enjoy the results of your hard work! There’s nothing quite like a fresh and clean living space.
Take some time to appreciate how much brighter your room looks now that all the dirt and grime has been removed. You may even find yourself noticing new details in your decor that you hadn’t noticed before.
A clean environment can also have a positive impact on our mental health. A cluttered or dirty space can contribute to stress and anxiety, whereas a clean space can help us feel more calm and relaxed. So take some deep breaths, relax, and enjoy the serenity of your newly cleaned surroundings.
This is also a great opportunity to rearrange any artwork or photos on your walls. Try out different configurations until you find one that feels just right for you. And if there’s an empty wall begging for some attention, why not try adding something new? It could be as simple as hanging up a new piece of art or investing in a statement piece of furniture.
Don’t forget to maintain the cleanliness of your walls by regularly dusting them with a microfiber cloth or vacuuming them with an attachment tool. With these simple steps, you’ll be able to enjoy your beautiful clean walls for years to come!
Conclusion
Cleaning your walls and wallpaper can seem like a daunting task, but it doesn’t have to be. By following these 10 simple steps, you can effectively clean your walls and wallpaper without damaging them. Remember to always gather your supplies before starting the process, vacuum and dust your walls beforehand, wash with a mild detergent followed by rinsing with water and drying with a soft towel.
If necessary, apply new paint or wallpaper after removing any old ones. Hang up new art or photos on your freshly cleaned walls for an added touch of decor. With these easy steps in mind, you will have sparkling clean walls that look brand new in no time!